Difference between revisions of "Troubleshooting"
Microseven (talk | contribs) |
Microseven (talk | contribs) |
||
| (One intermediate revision by the same user not shown) | |||
| Line 19: | Line 19: | ||
=== How to Test My Camera if It is Working Using a PC? === | === How to Test My Camera if It is Working Using a PC? === | ||
| − | How to test the camera with your PC | + | [https://blog.microseven.com/tech-support/2020/11/19/how-to-test-the-camera-with-your-pc/ How to test the camera with your PC] |
1. Turn off your laptop wifi if you have wifi on. | 1. Turn off your laptop wifi if you have wifi on. | ||
| Line 28: | Line 28: | ||
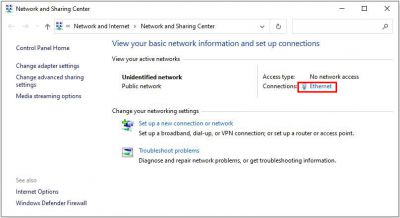
a) Go to Network and Sharing Center, click on Ethernet. | a) Go to Network and Sharing Center, click on Ethernet. | ||
| + | [[File:Networksharingcenter.jpg|alt=Go to Network and Sharing Center|none|thumb|400x400px|Go to Network and Sharing Center]] | ||
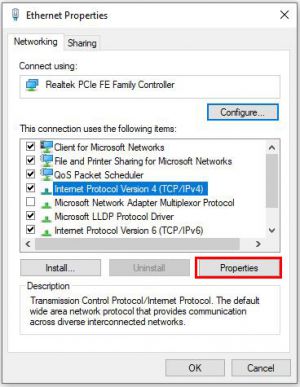
| + | b) It opens the Ethernet Properties window. Highlight the “Internet Protocol Version 4 (TCP/IPv4)”. And click on the Properties button. | ||
| + | [[File:Ethernet.jpg|alt=Go to Properties|none|thumb|Go to Properties]] | ||
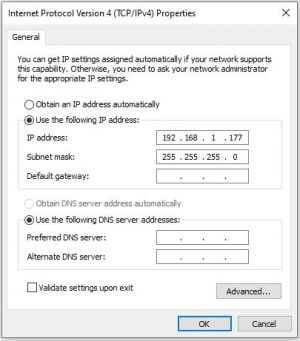
| + | c) You will select “Use the following IP address:”, then enter the following IP address and Subnet mask value in the fields and click OK to save the settings. | ||
| + | |||
| + | IP address: 192.168.1.177 | ||
| + | |||
| + | Subnet mask: 255.255.255.0 | ||
| + | [[File:Pc-ip-set.jpg|alt=Assign an IP address to your PC|none|thumb|Assign an IP address to your PC]] | ||
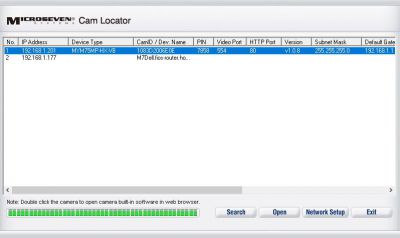
| + | 4. Open the Cam Locator software. Do a search for the camera. You will find two IP addresses in the Cam Locator software list. If the camera you set a static IP address in it, you may switch it to the DHCP, or you will simply reset the camera. The camera factory’s default IP address is 192.168.1.201 and DHCP mode. | ||
| + | [[File:Cam locator ind.jpg|alt=Search a camera|none|thumb|400x400px|Search a camera]] | ||
| + | 5. Highlight the camera, double click on it to open the camera system in a browser. | ||
| + | |||
| + | The camera log in default is: admin/password | ||
| + | |||
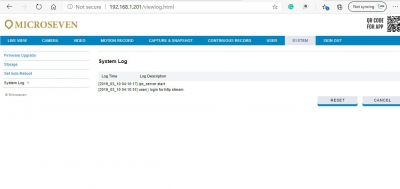
| + | 6. Now you can go ahead to go to SYSTEM -> Log | ||
| + | [[File:Log.jpg|alt=Read the log file.|none|thumb|400x400px|Read the log file.]] | ||
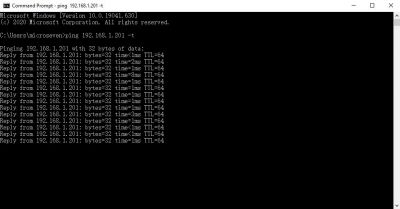
| + | 7. Test a ping in your PC dos prompt: | ||
| + | |||
| + | ping 192.168.1.201 -t | ||
| + | [[File:Dos ping.jpg|alt=Ping the camera IP address.|none|thumb|400x400px|Ping the camera IP address.]] | ||
| + | 8. If the ping result without any timeout, the camera is running healthy. You can find the SYSTEM log if the camera is up and running. | ||
Latest revision as of 07:23, 30 December 2020
How to Find a Camera in Cam Locator?
How to Find a POE Camera in Cam Locator?
How do I find a POE camera in the Cam Locator? I can't find my POE camera in the Cam Locator.
Before doing troubleshooting, you have to
- Ensure you have a POE/POE+ switch or a POE/POE+ injector. Both of them need a real POE/POE+ device with 802.3af standard or with 802.3at standard. The POE standard is for 802.3af, and the POE+ standard is for 802.3at.
- A camera is a POE camera.
- If you have an SD card in the camera, you may take it out of the camera.
Now you are doing troubleshooting. Connect a Cat5E cable between the switch and the camera. Check POE led at both ends, one is at the POE connector on the POE/POE+ switch, and another end is at the camera POE connector. The led lights must be on at two ends.
How to Find a WiFi Camera in Cam Locator?
I have changed a new router. How do I find my WiFi camera in the new router?
How to Upgrade the Firmware on My Camera?
How to Test My Camera if It is Working Using a PC?
How to test the camera with your PC
1. Turn off your laptop wifi if you have wifi on.
2. Power on the camera using a power 12V DC adapter. Connect the camera to your PC ethernet port via a Cat5E cable. Make sure the power on the camera and ethernet cable connected to the PC ethernet port.
3. Go to PC network setting to make your PC a static IP address:
a) Go to Network and Sharing Center, click on Ethernet.
b) It opens the Ethernet Properties window. Highlight the “Internet Protocol Version 4 (TCP/IPv4)”. And click on the Properties button.
c) You will select “Use the following IP address:”, then enter the following IP address and Subnet mask value in the fields and click OK to save the settings.
IP address: 192.168.1.177
Subnet mask: 255.255.255.0
4. Open the Cam Locator software. Do a search for the camera. You will find two IP addresses in the Cam Locator software list. If the camera you set a static IP address in it, you may switch it to the DHCP, or you will simply reset the camera. The camera factory’s default IP address is 192.168.1.201 and DHCP mode.
5. Highlight the camera, double click on it to open the camera system in a browser.
The camera log in default is: admin/password
6. Now you can go ahead to go to SYSTEM -> Log
7. Test a ping in your PC dos prompt:
ping 192.168.1.201 -t
8. If the ping result without any timeout, the camera is running healthy. You can find the SYSTEM log if the camera is up and running.
