Difference between revisions of "How to Setup WiFi Camera"
Microseven (talk | contribs) |
Microseven (talk | contribs) m (Microseven moved page How To to How to Setup WiFi Camera) |
||
| (5 intermediate revisions by the same user not shown) | |||
| Line 1: | Line 1: | ||
__FORCETOC__ | __FORCETOC__ | ||
| − | + | You can set up a WiFi security camera in a different way. The result is the same. | |
| − | === Hardware Requires | + | = How to Setup WiFi on Camera Using an Internet Browser = |
| + | |||
| + | == Hardware Requires == | ||
* WiFi router | * WiFi router | ||
| Line 10: | Line 12: | ||
* Ethernet cable (using for the ONLY set up for WiFi, it won't use after the WiFi setup completed) | * Ethernet cable (using for the ONLY set up for WiFi, it won't use after the WiFi setup completed) | ||
| − | + | == Software Requires == | |
Microseven Cam Locator. The Cam Locator is a part of Microseven CMS software. Download CMS from [https://www.microseven.com/myaccount/download.html microseven.com]. There are for Windows 10 and macOS. | Microseven Cam Locator. The Cam Locator is a part of Microseven CMS software. Download CMS from [https://www.microseven.com/myaccount/download.html microseven.com]. There are for Windows 10 and macOS. | ||
| − | + | == Hardware Setup == | |
* Power on the WiFi camera with the power supply 12V DC. | * Power on the WiFi camera with the power supply 12V DC. | ||
* Connect WiFi router to the WiFi camera with an Ethernet cable. | * Connect WiFi router to the WiFi camera with an Ethernet cable. | ||
| + | [[File:Power 12VDC and Ethernet..jpg|alt=Power 12VDC and Ethernet.|none|thumb|300x300px|Power 12V DC and Ethernet.]] | ||
| − | == | + | == WiFi Setup == |
1. Open the Cam Locator. Click the Cam Locator icon on the desktop. | 1. Open the Cam Locator. Click the Cam Locator icon on the desktop. | ||
[[File:Camlocator.jpg|alt=Cam Locator icon.|none|thumb|Cam Locator icon.]] | [[File:Camlocator.jpg|alt=Cam Locator icon.|none|thumb|Cam Locator icon.]] | ||
| Line 39: | Line 42: | ||
[[File:Test pass then clicks APPLY..jpg|alt=Test pass then clicks APPLY.|none|thumb|500x500px|Test pass then clicks APPLY.]] | [[File:Test pass then clicks APPLY..jpg|alt=Test pass then clicks APPLY.|none|thumb|500x500px|Test pass then clicks APPLY.]] | ||
| − | + | = How to Set up WiFi on Camera Using Hotspot on the Phone = | |
| + | |||
| + | == Hardware Requires == | ||
| + | * WiFi router | ||
| + | * WiFi camera | ||
| + | |||
| + | * Power supply 12V DC | ||
| + | |||
| + | == Software Requires == | ||
| + | |||
| + | * Microseven app (Available on App store and Google Play store, the keyword for the app searching is "Microseven" | ||
| + | |||
| + | == Hardware Setup == | ||
| + | * Power on the WiFi camera with the power supply 12V DC. | ||
| + | [[File:Power 12VDC and Ethernet..jpg|alt=Power 12VDC and Ethernet.|none|thumb|300x300px|Power 12V DC]] | ||
| + | |||
| + | == WiFi Setup == | ||
1. Hold the reset button on the camera harness cable for 20 seconds until popping up the sound if the camera has a speaker. | 1. Hold the reset button on the camera harness cable for 20 seconds until popping up the sound if the camera has a speaker. | ||
[[File:Reset button.jpg|alt=Hold the reset button for 20 seconds.|150x150px|Hold the reset button for 20 seconds.|none|thumb]] | [[File:Reset button.jpg|alt=Hold the reset button for 20 seconds.|150x150px|Hold the reset button for 20 seconds.|none|thumb]] | ||
| Line 95: | Line 114: | ||
22. Find the camera just added, and tap on the new camera icon to play the live stream video. | 22. Find the camera just added, and tap on the new camera icon to play the live stream video. | ||
[[File:23-add-wifi-a.jpg|alt=Tap on the new camera added on the Live View screen.|none|thumb|Tap on the new camera added on the Live View screen.]] | [[File:23-add-wifi-a.jpg|alt=Tap on the new camera added on the Live View screen.|none|thumb|Tap on the new camera added on the Live View screen.]] | ||
| − | |||
23. Play the live streaming video on the app. | 23. Play the live streaming video on the app. | ||
[[File:24-0-add-wifi-a.jpg|alt=Play the live video from the camera.|none|thumb|Play the live video from the camera.]] | [[File:24-0-add-wifi-a.jpg|alt=Play the live video from the camera.|none|thumb|Play the live video from the camera.]] | ||
Latest revision as of 07:55, 28 December 2020
You can set up a WiFi security camera in a different way. The result is the same.
How to Setup WiFi on Camera Using an Internet Browser
Hardware Requires
- WiFi router
- WiFi camera
- Power supply 12V DC
- Ethernet cable (using for the ONLY set up for WiFi, it won't use after the WiFi setup completed)
Software Requires
Microseven Cam Locator. The Cam Locator is a part of Microseven CMS software. Download CMS from microseven.com. There are for Windows 10 and macOS.
Hardware Setup
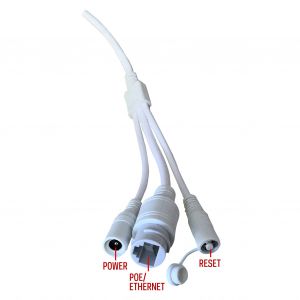
- Power on the WiFi camera with the power supply 12V DC.
- Connect WiFi router to the WiFi camera with an Ethernet cable.
WiFi Setup
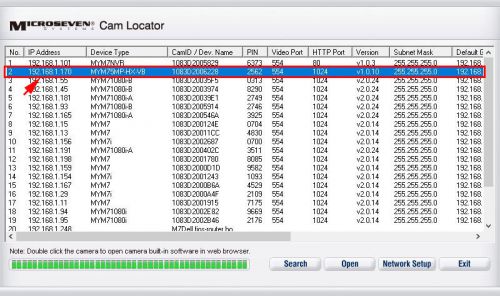
1. Open the Cam Locator. Click the Cam Locator icon on the desktop.
2. Find the camera in Cam Locator. Click on the camera and open it in an internet browser.
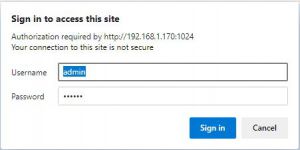
3. Login to the camera; the default login username is "admin", and the default password is "password".
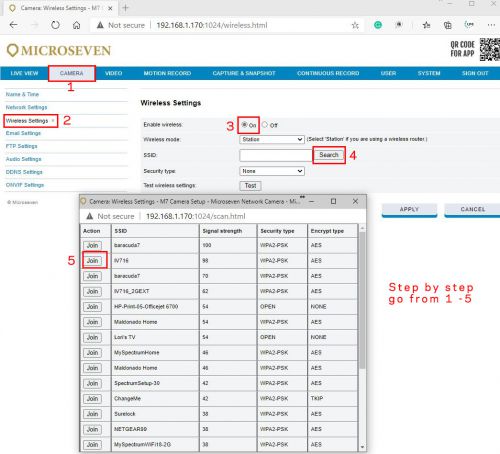
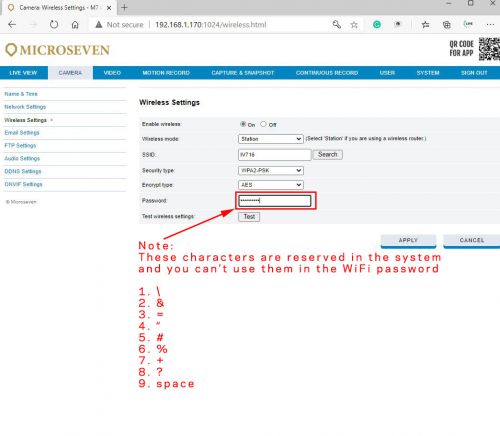
4. Go to menu CAMERA -> Wireless Settings -> Click On -> Go Search. A popup window shows up, then select the WiFi router that you want to 'Join.'
5. Selected a WiFi router to 'Join', then select Infra as Network Type. Ensure the security type and encryption type match with your WiFi router, and then enter a WiFi router password. Click the 'Test' button.
In most cases, the security type is 'WPA2-PSK,' and the encryption type is 'AES'. Check the info on the router if you need it.
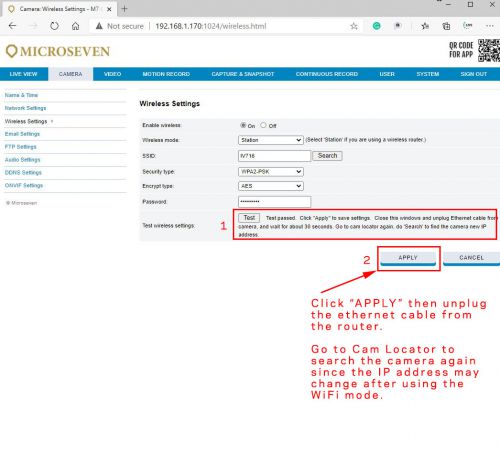
6. After the test passed, click 'Apply' to save the settings. Go to unplug the Ethernet cable from the router, then open a Cam Locator window to search the camera again. You will find the camera with a WiFi IP address to connect the camera via WiFi.
How to Set up WiFi on Camera Using Hotspot on the Phone
Hardware Requires
- WiFi router
- WiFi camera
- Power supply 12V DC
Software Requires
- Microseven app (Available on App store and Google Play store, the keyword for the app searching is "Microseven"
Hardware Setup
- Power on the WiFi camera with the power supply 12V DC.
WiFi Setup
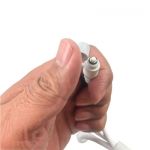
1. Hold the reset button on the camera harness cable for 20 seconds until popping up the sound if the camera has a speaker.
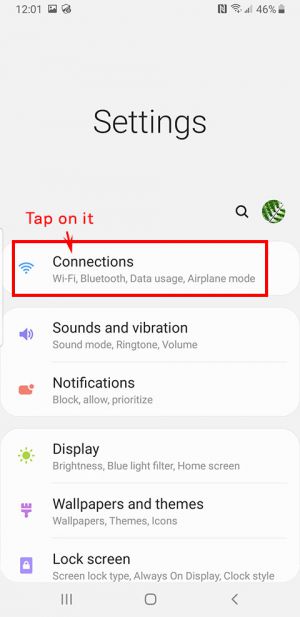
2. Find the Settings icon, tap on it to open Settings screen.
3. Tap on the Connections on the Settings screen.
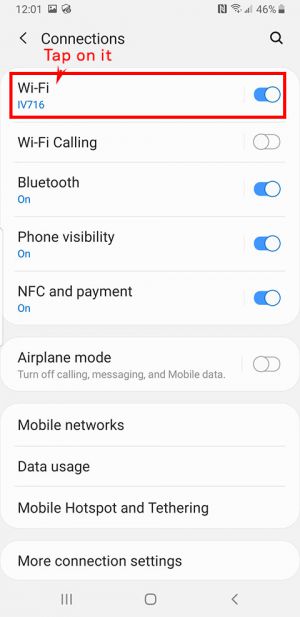
4. Tap on the Wi-Fi menu on the Connections screen.
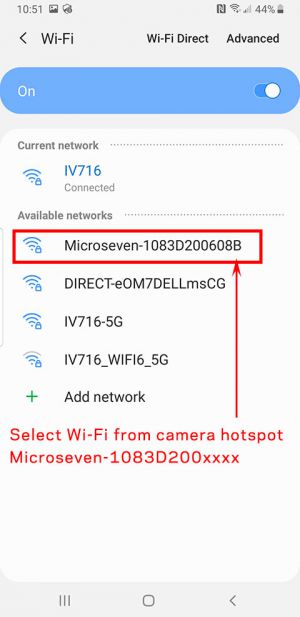
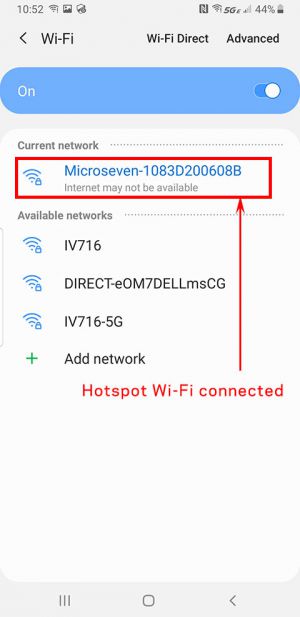
5. The Microseven-1083D200xxxx network displays on the Wi-Fi screen. Select and tap on it.
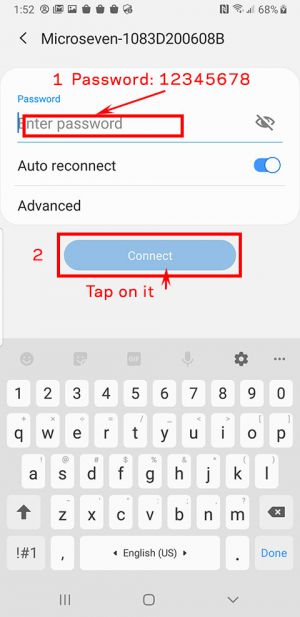
6. Enter the camera Microseven-1083D200xxxx wifi network password. The password is 12345678. Then tap on the Connect button.
7. The camera hotspot wifi network is connected after a few seconds.
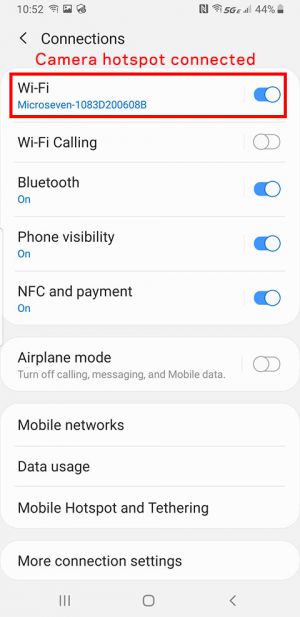
8. The status of the camera hotspot wifi is connected.
9. Go back to the main screen, find the Microseven app icon and tap on it to open the app.
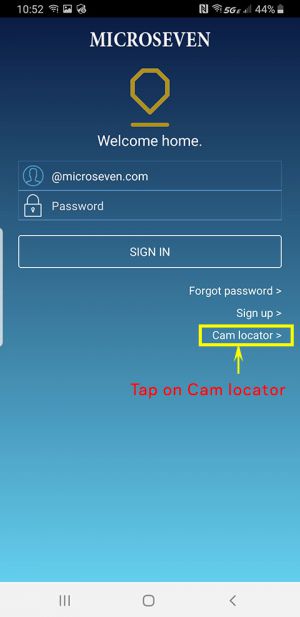
10. Tap on the Cam Locator on the login screen.
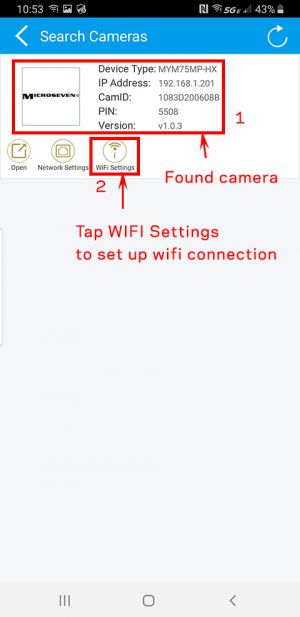
11. The camera is found on the list on the Search Cameras screen. Then tap the WiFi Settings icon to set up a wifi connection.
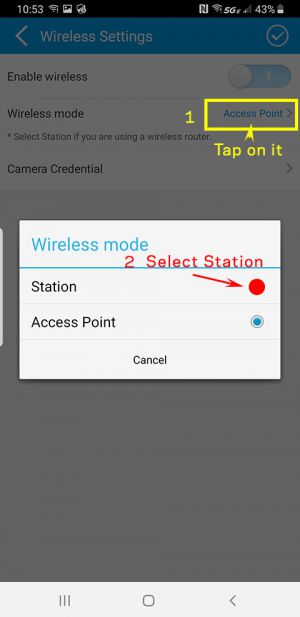
12. The first of all, tap on Wireless mode. The second, select Station while the Wireless mode window pops up.
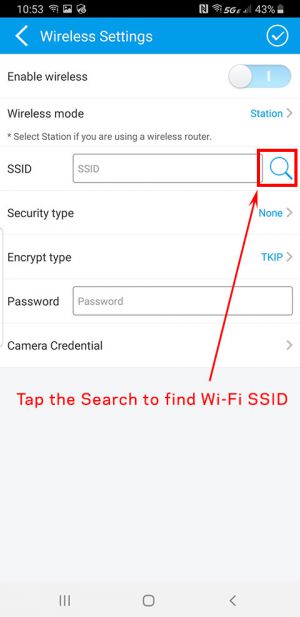
13. The next, tap on the Search icon to find Wi-Fi SSID from the wifi router.
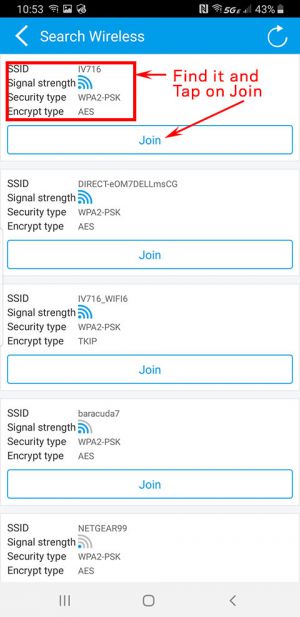
14. Tap on the Join button after you find the wifi connection.
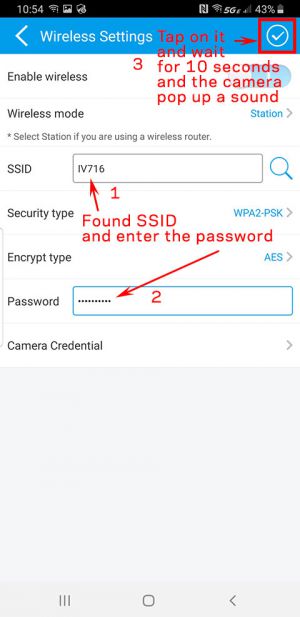
15. The SSID may display in the SSID field automatically. Enter the wifi router’s password where the wifi network you want to connect. Next, tap on the checkmark to make connecting to the wifi router. Please wait for 10 seconds and the camera pops up a sound. Most of the time, after 10 seconds, the camera hotspot wifi is going to disconnect. You will go to the phone screen after disconnecting from the camera hotspot wifi network.
16. Go back to the screen, find the Microseven app icon and tap on it to open the app.
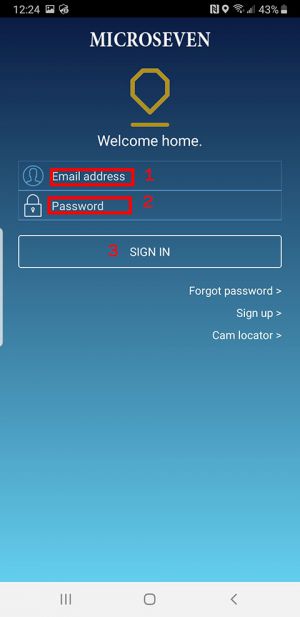
17. Enter your email address and login password on the Microseven app. And tap on the SIGN IN button.
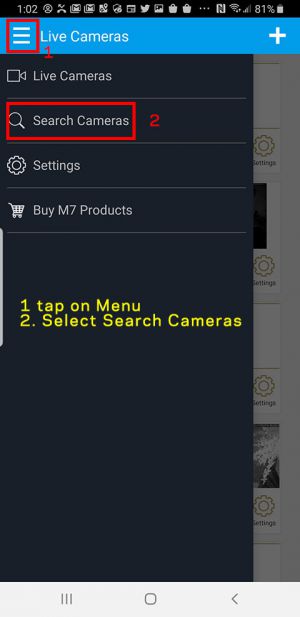
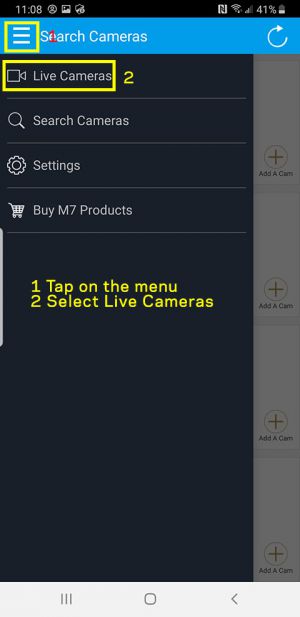
18. Tap on Menu icon, and select Search Cameras.
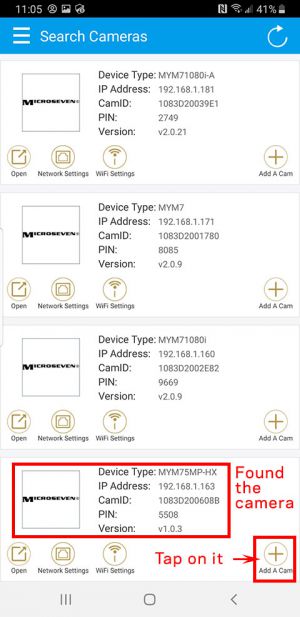
19. Find the wifi camera and tap on Add A Cam.
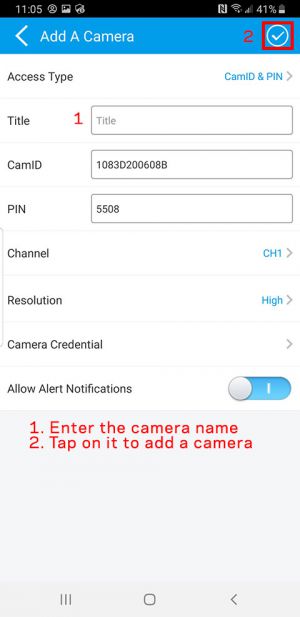
20. Enter the Title, and tap on the checkmark to add the camera on the app.
21. Tap on Menu, and select the Live Cameras. to go back to the Live Cameras screen.
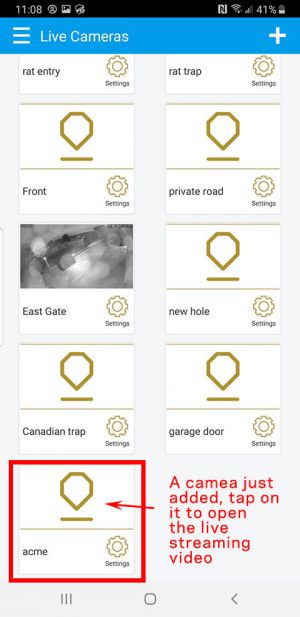
22. Find the camera just added, and tap on the new camera icon to play the live stream video.
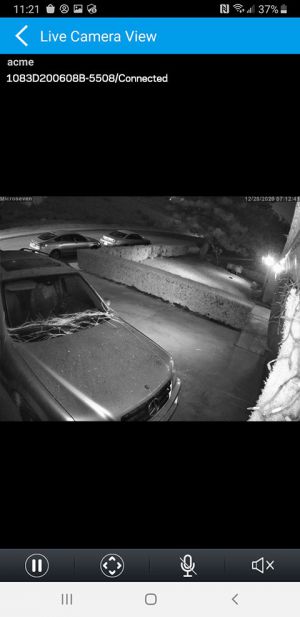
23. Play the live streaming video on the app.
